
System Online
Hey everyone, and welcome back to the blog! For today’s story, I’m peeling back the curtain on the exciting (and sometimes nerve-wracking) moment of launching a new web application from scratch.
The Big Milestone: Going Live
Last night was a defining moment for our development team. After months of writing code, testing features, and squashing bugs, we finally made the leap. Our very own Inventory Management & Billing System is officially live!
We chose a cPanel environment to host this project. There’s a particular kind of tension in that moment right before you click ‘Execute’ in your MySQL manager, followed by the final file upload via FTP. I wanted to capture and share a screenshot from right after that process completed, when we saw the actual front end render properly in our browser for the first time.
First Look: The Login and Sign-Up Experience
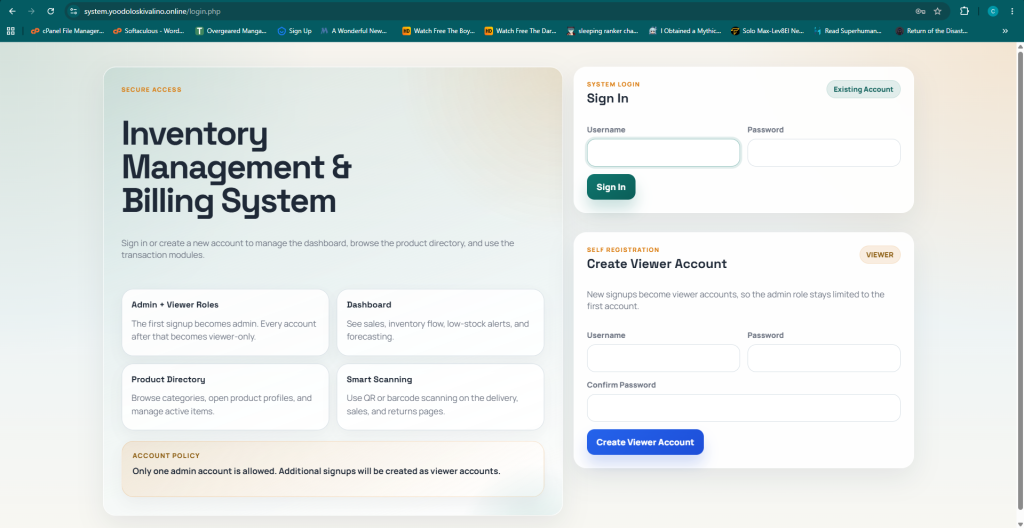
The main visualization here, with the caption: A first look at the clean, card-based interface for our newly deployed Inventory & Billing system.]
Here is what we saw! I’m thrilled with how it turned out. We decided on a minimalist, card-based interface with a cool, modern aesthetic. The goal was simplicity and clarity. The left side provides a clear overview of the main modules: Dashboard, Product Directory, and Smart Scanning.
We also designed a clever user-role logic that you can see detailed right there on the screen. To keep the database secure and manage access without needing a complex administrative backend immediately, we built a single-admin system:
“The first signup becomes admin. Every account after that becomes viewer-only.”
This is a great, simple security measure for this version.
Behind the Scenes: The Deployment Process
As mentioned, the journey to that screen involved several core steps within our cPanel:
- Setting up the Environment: We created a fresh MySQL database and database user.
- Schema and Initial Data: We imported our SQL schema (all the table definitions for
products,users,transactions, etc.) using the PHPMyAdmin tool provided by cPanel. - Configuring the App: A crucial step was editing the PHP configuration file (
config.php) with the new database name, username, and password we just generated, connecting the application code to its data. - Final Upload: Finally, we used an FTP client to transfer all the core application files (seen partially listed in the ‘cPanel File Manager’ tab of the open browser in the picture above into the
public_htmldirectory of our server.
And voilà! The system you see in the screenshot is running live, waiting for its very first user registration (who will, by rule, become the all-powerful first Admin).
What’s Next?
Getting the system online is just Phase 1. Over the next few weeks, we’ll be:
- Testing Core Flows: We’ll be running full end-to-end transaction tests—adding products via ‘Smart Scanning’, generating test invoices, and verifying real-time stock updates.
- Finalizing the Billing UI: Expanding the transaction modules to support customized, printable PDF invoices.
- Security Review: Hardening the login process shown in
image_0.pngand ensuring robust input sanitization.
Over to You
What’s the best (or worst!) memory you have from a project deployment night? The thrill of the ‘it works’ moment or a frantic last-minute bug fix? Share your stories below!